Location Location Location
An old dog biscuit factory would not usually be my first choice of shooting location. Fortunately, evidence of the former use of our venue as a manufacturer of doggy treats was nowhere to be seen. Instead this gorgeous old building has been transformed into stylish loft style apartments, with large expanses of bare brick wall, wooden floors and original industrial style windows. It was the perfect place in which to shoot some sexy lingerie, edgy nudes, shabby chic glamour.
Normally when arriving at a new location the first hour can be eaten up exploring the possibilities of where to shoot, where the light will be at what time and generally formulating some kind of a plan for the day. On this occasion however, confronted by the large open plan room with dual aspect floor-to-ceiling windows and rustic brick walls, it was pretty obvious where to start. The plan can wait…let’s get shooting!
Mixing It Up
Time Check
With the model being the centre of the clock 12 o’clock is located at the edge of the window frame behind the model.
Start with the tricky stuff and things can only get easier is a method I seem to frequently employ and this shoot was no different. This image was shot within the first thirty minutes. Mixing daylight with flash and a smidgen of available continuous light is always a challenge. Using my trusted Bowens studio strobes means having to keep the shutter speed below 1/200s. Picking up that continuous light source meant having to either keep the ISO high, the shutter speed slow or the aperture wide! More likely a combination of all three. So where to start?
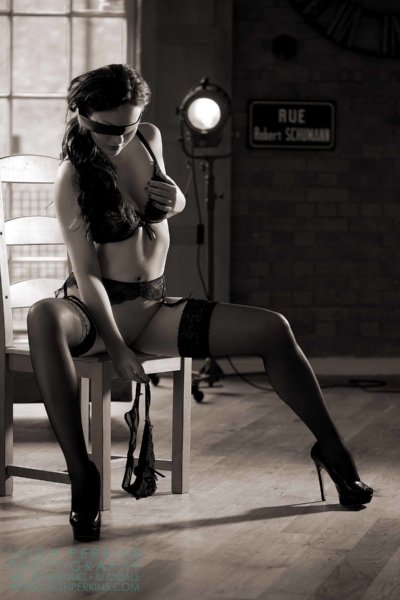
Well the most obvious place to begin is with the part of the equation you can’t control – daylight. I took a couple of snaps at different exposures, taking little care to pose the model or compose the shot too carefully. I soon had a pretty close approximation of where we were at with regards to the daylight exposure. ISO 100, f3.5 and 1/100s was the chosen setting. I was using my 105mm lens and in conjunction with the wide f3.5 aperture I would be able to throw the background out of focus enough to be present but not too distracting. The 1/100sec shutter speed would be fast enough to eliminate any camera shake. The old rule of thumb engrained into me at an early age of “use a shutter speed to match your lens length to avoid camera shake” is stuck in my head like the sound of a broken record. Good advice though, even if we do have the modern benefits of “Vibration Reduction” lenses and the like. The stock standard low noise ISO 100 option was simply a by-product of the aperture and shutter speed, a fortunate one at that. I know these days we can shoot at insanely high ISO numbers and still keep the noise levels relatively low, but I can still see the increase of unwanted grain from ISO400 and up. The other unwanted side-effect of high ISOs is the lack of contrast as we move up the scale. True, we can add contrast in post-production but as always let’s get as much right in-camera as possible. ISO100 was dialled in.
Keep Your Distance
Next was deciding where to put our model and how to light her. The idea for this image had long-since formulated itself in my head, now it was just a question of re-creating it in the real world. I wanted to create a feeling of space around the model and represent the size of the room she was in. Positioning her well-away from the background – in this case the full height windows – and letting it drift out of focus would help achieve this. Adding some distant props such as the “stage light” would also help emphasise the distance behind her. Keeping the foreground minimalist with the model posing on a simple chair could also help. The final piece of the puzzle was to create some lighting that would throw some long shadows on the floor again emphasising the sense of space.
I placed a single strobe on a stand at about 2 o’clock to the model (behind to her left) and fitted it with a standard reflector dish with some barn doors and diffusion paper. This created a strong highlight down the side of her body, face, legs and arms. The barn doors were opened fully up top and bottom to allow as much “vertical” light as possible. The side barn doors were kept narrow to restrict the spill of light across the floor behind and in front of the model and also to eliminate any chance of “flare” creeping into my lens. By keeping the light fairly low in height, as well as lighting the model I had also created some lovely shadows of the legs, both hers and the chairs, stretching across the floor.
The second light was another studio strobe, also with a standard reflector, positioned at about 10 o’clock (behind and to her right). This light had the addition of a honeycomb attached to it. Once again this created some strong highlights on her arm, body and legs. To get the spread of light needed, the strobe was positioned quite far away and the power cranked up. Care was taken to direct the light so as not spill onto the floor and destroy the aforementioned shadows. The power of both lights was then adjusted accordingly to give an exposure a couple of stops higher than the cameras settings making the highlights nicely prominent.
A Bit of a Red Herring
Finally, let’s look at that spot light in the background. To be fair it’s a bit of a red herring really. It serves no other purpose that to act as a prop to make the shot a little more interesting. Whilst pointing directly at the model it may appear to be providing some of the highlight on her left side, when in fact that is being created wholly by the studio strobe on that side. It’s an effective illusion which adds a bit of interest. By chance it’s perfectly exposed with the current camera settings which was just as well as it was either on or off with no option of an inbetween.
The rest of course was easy…ish. The problem with this particular model – Tina – is the huge array of lingerie that she has permanently stashed in her travel bag. Being the indecisive soul that I am means much time can be wasted sifting through various bras, knickers, stockings and shoes before inevitably ending up back at the beginning. If in doubt, which frequently I am when it comes to such matters, head for the safety of a classic black stockings and suspenders combo with underwear and heels to match. The addition of a necktie as a blindfold was one of those “suck it and see” moments which often prove to be the making of a shot.
Voila…we were done, shoot, shoot, shoot. So many great images were captured, some with foreground detail for even more depth, some with props such as an old cine camera, sitting, standing, full length, tight crops, we did them all. You can of course view more images from this shoot in our Members Section below. I hope you enjoy. ?
The second part of this post contains additional lighting, shooting and posing tips and images including some NSFW artistic nudity. It is available to members only – not a member? Join here.

Outstanding! Love everything about this shoot! Including Tina! Her poses are incredible!
Thanks Gary. She is a dream to work with, I can’t deny it!
‘Walking the line’ matters a lot to shots like these, as you say: though I’m guessing that Johnny Cash wasn’t playing in the background. I imagine that Tina’s choice of music is more contemporary!